The human eye is widely considered the window to the soul, making it the focal anchor of every portrait. Yet many artists struggle with eye drawing because they treat the eye as a flat almond shape floating on the face. To draw a realistic, expressive eye, you must understand the underlying anatomy: a moist spherical eyeball resting inside a bony orbital socket, wrapped by flexible upper and lower eyelids.
Because the eye is a sphere, the white of the eye (the sclera) is never pure white. It receives light from one side and curves into soft shadow at both outer and inner corners. Shading the sphere creates depth and prevents the dreaded "sticker" effect.
Step-by-Step Illustrated Eye Drawing Masterclass
Construct the Underlying Eyeball Sphere and Socket
Using a hard 2H pencil, lightly sketch a complete sphere representing the eyeball. Above it, lightly indicate the curve of the brow bone ridge.
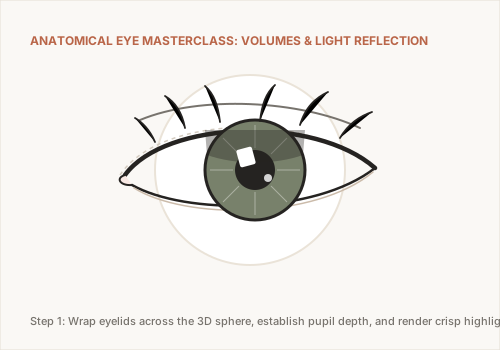
This sphere ensures that when you wrap the eyelids across its surface in subsequent steps, they curve realistically in 3D perspective rather than flattening into two straight lines.
Wrap the Upper and Lower Eyelids
Draw the upper eyelid arching across the sphere. Notice that the highest peak of the upper lid occurs roughly one-third from the inner corner, while the lowest dip of the lower lid occurs one-third from the outer corner.
Do not forget the tear duct (caruncle) at the inner corner. Crucially, draw the lower lid "shelf"—a visible band of thickness where lower eyelashes sprout.
Position the Iris and Preserve Specular Highlights
The iris is a perfect circle, but in relaxed gazes, the top portion is partially covered by the upper eyelid. Draw the circular iris, then center the black pupil inside it.
Before applying any graphite to the iris, mask or outline a crisp geometric highlight representing your studio light or window reflection. Keeping this highlight clean white is critical for lifelike moisture.
Render Iris Striations and the Limbal Ring
Darken the pupil to a deep velvety black with a 6B pencil. Outline the outer border of the iris with a defined, dark line known as the limbal ring.
From the pupil outward, draw fine radial striations and wavy crypts. Drop a cast shadow across the upper third of the iris cast by the overhang of the upper eyelid and lashes.
Draw Natural Eyelashes and Sclera Shadows
Shade the corners of the eyeball sphere to give it roundness. Draw eyelashes using quick, curved flick strokes that root at the lash line, curve downward slightly, and curl upward.
Group lashes into small overlapping clusters rather than evenly spaced parallel spikes. Lower lashes should be shorter, sparser, and emerge from the outer edge of the lower lid shelf.
Because the upper eyelid has thickness and eyelashes overhang the eyeball, it always casts a soft downward shadow across the top of both the sclera and the iris. Omitting this shadow makes the eye look flat and unnervingly wide open.
Connecting Eye Anatomy to Other Styles
Once you understand realistic eye anatomy, see how manga artists adapt these principles in our Anime Drawing Guide, or tackle the other great anatomical challenge with our Drawing Hands Masterclass.